
Now that Pro Tool Reviews has a new storage/workshop space, there’s still the question of what to do with all our “stuff”. Of course, when we were browsing the building plans and even taking part in the erection, it seemed so big. But once we moved in all the tools, boxes, shelves, and personal belongings—we quickly realized just how space-limited a 2000 sq. ft. steel building can be. We needed a solution. That spurred us to write this How to Build Hanging Shelves article for our steel building. Using a suspended shelving and storage solution, we could relocate a lot of our materials, supplies, and products out of the way…way out of the way.
What do you do when you have an all-steel building, including steel rafters, purlins, and girders, but you need more storage? Yes, I know, you take a trip to the local Lowe’s home improvement store. But how do you most efficiently clear out space? Sure, we could go with industrial shelves on the floor, or we could build shelving from standard lumber. Those solutions still were not cutting it. There had to be something better.
And then we looked up.
Planning Our How to Build Hanging Shelves Project
The realization was that we had a ton of space above our heads that would rarely be used by anything other than hot Florida air. Then, a light bulb moment occurred—let’s build suspended shelves! A few measurements later, after scratching some notes on the clipboard, we had a plan. It was time to use the Lowe’s app and fill the virtual (soon-to-be actual) shopping cart with our needed items.
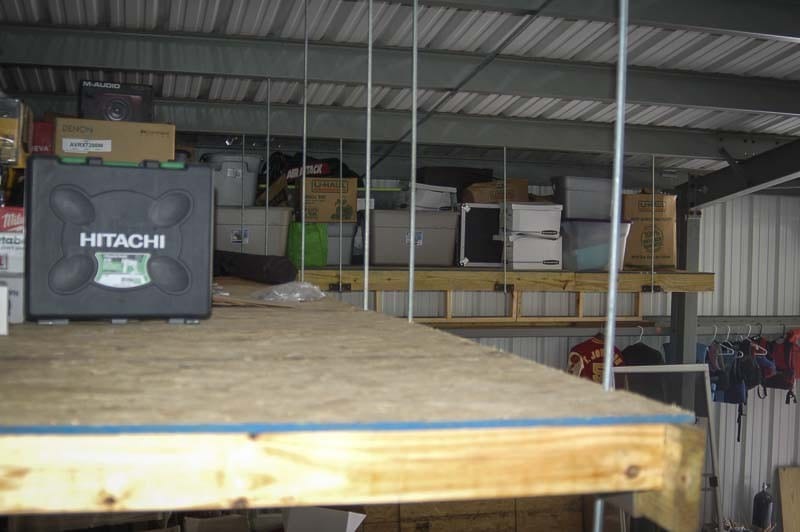
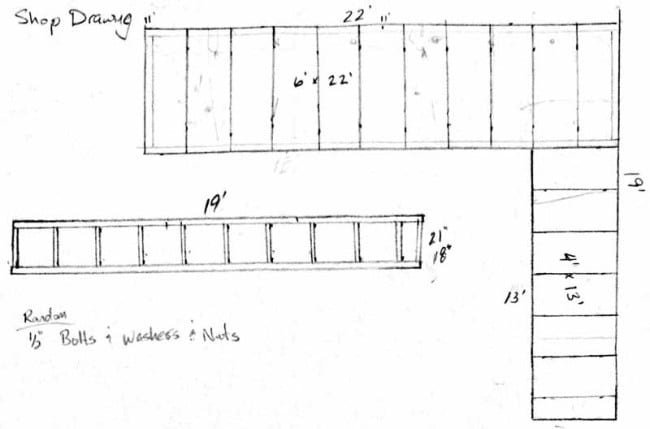
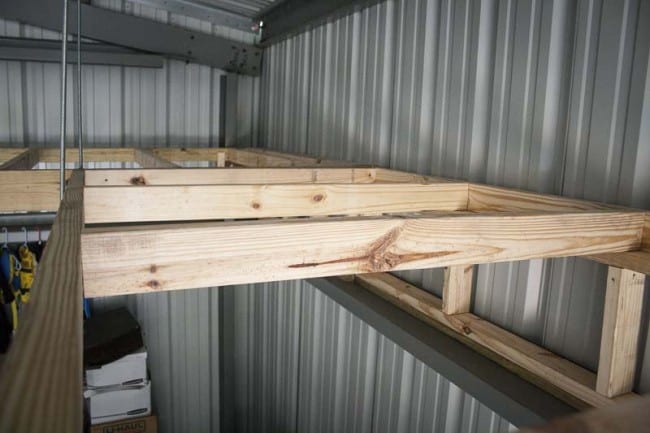
We decided to build a 6-foot deep shelf along the far gable wall opposite our main 12×14 Clopay commercial garage door and tie that into another shelf only 4 feet deep along the west wall. The back of the shelves would be supported by the horizontal purlin that hovers around the 8 feet mark (from the concrete floor). The front of the shelf would be suspended; therefore, the support would come from allthread attached to the steel roof purlins. The fascia of each shelf would be 2×6 pressure-treated lumber with the rest of the framing being constructed out of standard 2×4 pine. The decking would be 1/2” OSB—after all, we wouldn’t be walking around up there.
Building Using Modular Sections
It made sense to build these in a few different modular sections, install them independently, and then bolt them together using 1/2” diameter bolts and nuts. Standard 24” on-center 2×4 joists seemed to be plenty strong enough to hold the anticipated weight load, along with the 1/2″ decking screwed to the 2×4 joists. Here’s what our plan looked like:
Purchasing Materials to Build Hanging Shelves in Your Garage
It was time to go shopping, or at least finish our shopping by retrieving what we purchased. We hit the checkout button on the Lowe’s app and used the “Free Store Pickup” selection, so we could grab a quick bite, then head to our local Lowes to pick up all our goodies. Upon arrival, all our smaller items were boxed and ready…we arrived a little too quick…so we had to help in selecting the lumber, at Lowes, from our list. We loaded up the Chevy, tied down the lumber, and attached the Lowes-provided red flag to the end of 12’ 2x4s and 2x6s hanging out the back of the pick-up truck. Here’s a copy of our shopping list:
| Description | Lowe’s Item # | Price (USD) | Qty | Extended |
|---|---|---|---|---|
| Steelworks 0.5-in x 72-in Standard (SAE) Threaded Rod | 44610 | $12.50 | 9 | $112.50 |
| Project Pak 25-Count 1/2-in-13 Zinc Standard Hex Nuts | 43647 | $6 | 2 | $12 |
| Hillman Group 25-Count 1/2-in x 1-1/4-in Zinc Flat Washers | 3093 | $7 | 3 | $21 |
| OSB Sheathing 7/16 CAT PS2-10 | 12212 | $18 | 10 | $180 |
| #2 Prime Pressure Treated Lumber (Common: 2 x 6 x 12) | 198476 | $13 | 2 | $26 |
| #2 Prime Pressure Treated Lumber (Common: 2 x 6 x 8) | 196037 | $8.50 | 2 | $17 |
| #2 Prime Pressure Treated Lumber (Common: 2 x 4 x 10) | 196453 | $7 | 4 | $28 |
| #2 Kiln-Dried Southern Yellow Pine S4S (2 x 4 x 8) | 6005 | $5 | 36 | $180 |
| #2 Prime Pressure Treated Lumber (Common: 2 x 4 x 12) | 196496 | $10 | 2 | $20 |
| Hillman Group 1/2-in- 13 x 4-in Zinc Standard Hex Bolt | 63331 | $1.50 | 12 | $18 |
| Grip-Rite 3 in x .120 Hot-Galvanized Ring Shank Nails 500 ct | 69262 | $24 | 3 | $72 |
| Total | $686.50* |
Engineering the Hanging Shelves for Our Shop
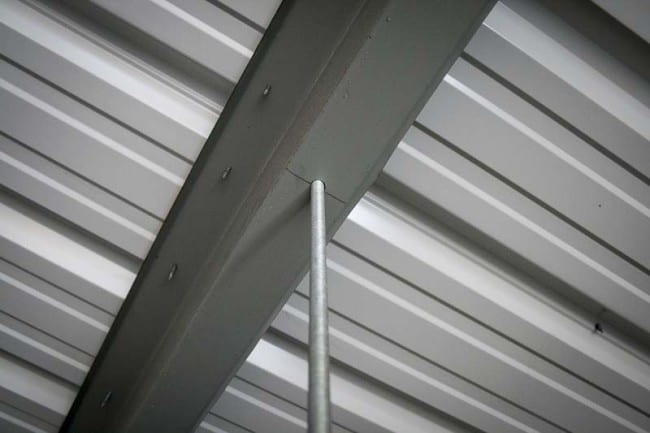
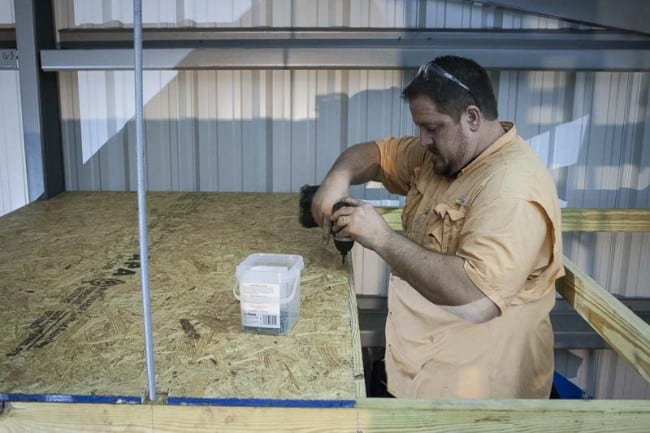
After picking up the materials it was time to build our hanging shelves. We unloaded the lumber and accessories and set up the Bosch Axial Glide 12″ Miter Saw for making our cuts. We quickly began cutting lumber and loaded our 3-inch framing nails into a Metabo HPT NR90AES framing nailer to assemble each suspended shelf frame. Once the first modular frame was completed, we then needed to provide a place for the 1/2″ allthread to terminate on the shelf side (we already knew it was going to be bolted to the steel roof purlin on the other end).
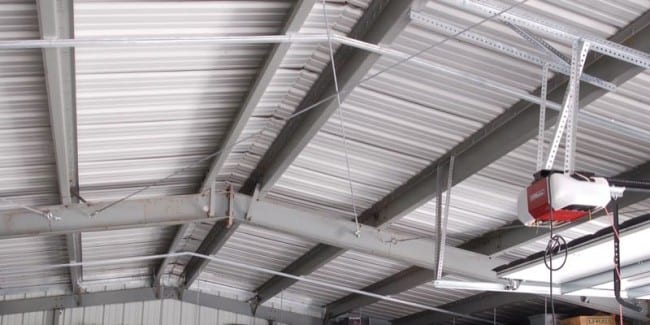
Using a 1/2” Irwin Speedbor spade drill bit, we carefully made a comfortable hole all the way through the 2×6 fascia board. This 1/2” hole is where our allthread would pass through—capped with a 1/2″ nut and 1” washer on the other end. We repeated this procedure every few feet, covering each location that had vertical access to a roof purlin.
Installing the 2×6 Framing and Decking
Now we were ready to build the first section of our hanging steel building shelves. The decking would follow after we had the framing for the hanging shelves in place. After securing the rear of the shelves to the horizontal purlins with some temp framing, we raised the front of the shelves, fished the allthread through the 1/2” holes in the 2×6 fascia, and then terminated it with a 1” washer and ½” nut. Realizing that the roof has a 12:1 pitch, it seemed like a good idea to cut some wood spacers that would have the same offset as the roof (~5 degrees). The spacer allowed the washer and nut to sit flat and spread the load evenly throughout the washer and nut.
Next, we quickly cut the length of our decking to the desired 6’ of the shelf depth, threw it up, and screwed it down with 2” deck screws.
Adding Additional Supports
The more we looked at our new creation, the more we started to think that the allthread going through the 2×6 alone didn’t give us the utmost certainty for the load or safety. After a few minutes of discussion and digging through some material, we ended up cutting 12” pieces of 1-1/2” x 1-1/2” steel angle, drilled a 3/4” hole in the angle, and used this to further support the bottom of the 2×6.
After repeating this process a few more times, we eventually had our suspended shelves completed. We used our trusty Johnson 48-inch Bamboo level and then turned the 1/2” nuts (left or right) to true-up the shelves and make all our suspended steel building shelving plumb and level.
Conclusion
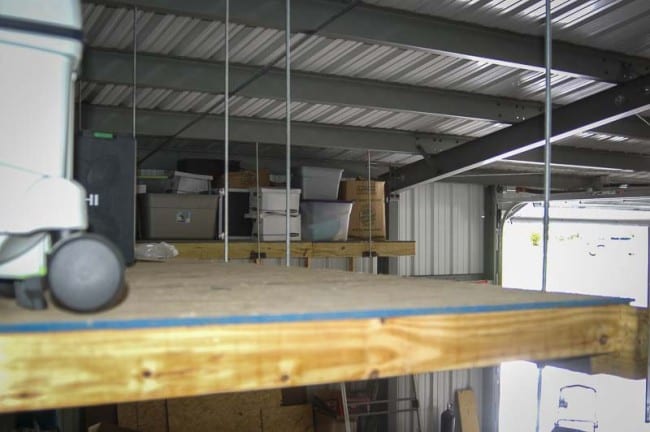
We took about 2-1/2 minutes to marvel at our new storage area that saved a ton of our floor space…then we started filling those shelves with our junk. Did I say junk? I meant to say priceless jewels, tools, and personal belongings. Regardless, the suspended shelving idea is pretty cool, and the best part is that, for under $400, you can find everything you need to build this project at your local Lowe’s store.
