
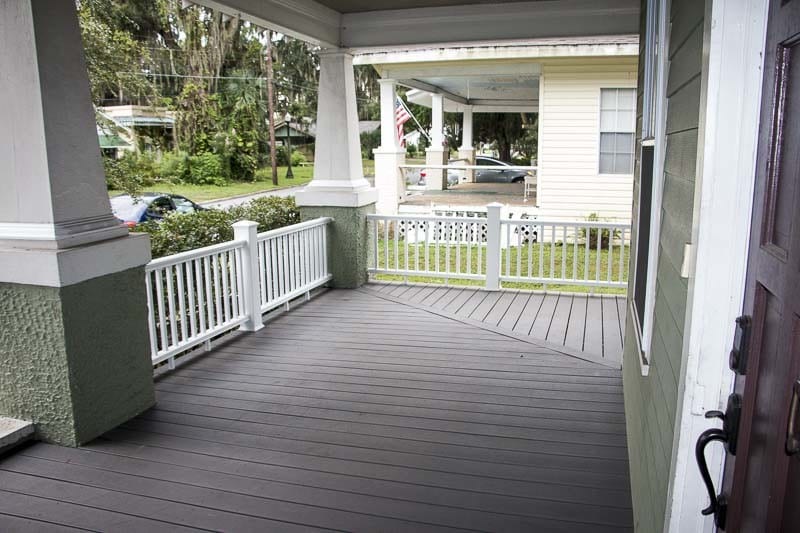
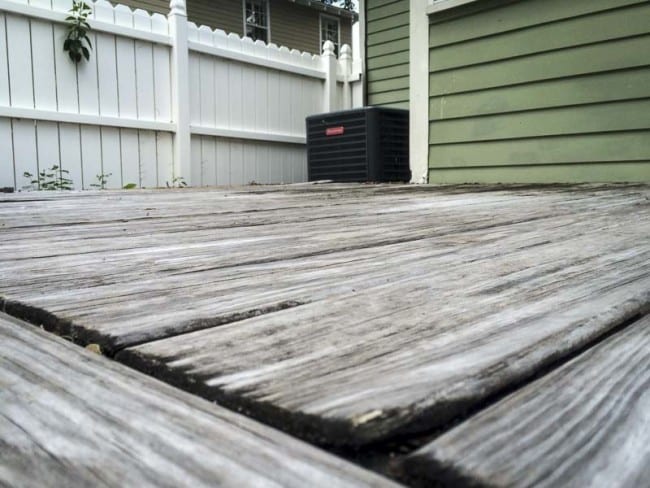
 I live in an historic district in central Florida where most of the homes were built during the 1920’s or earlier. My own home was built sometime between 1919 and 1923 (the historical records lack an exact date for it). These old homes have lots of character, particularly with regard to their porches, which are covered and often constructed with old growth oak or heart pine decking. Mine has a second generation heart pine porch which was in need of repair—mostly due to termites and water encroachment upon the front edges where it’s pelted by each year’s daily summer rains. My neighbor three doors down has replaced his porch…three times over the last 18 years—each time with pressure-treated 5/4 lumber boards. Pressure treated decking is fine, but if it’s not treated properly and maintained carefully, it can rot, warp, and decay. A good case in point was the material on my back deck which was also read to be replaced. Given the time it takes to install a new deck on a large wraparound porch, I was in no mood to do this more than once. I decided to install Deckorators Vista composite decking so that I could have a once-and-done approach to recovering my front porch (and also my back deck). Fortuitously, Deckorators also has railing kits and posts, so everything about my front porch could be made new again.
Deckorators Options
People go with composite decking because they want a durable solution that remains weatherproof and holds its finish for years to come. Where 5/4 pressure treated boards will curl and require additional treatment over time, composite decking requires very little maintenance (only cleaning) to retain its original look. If the framing underneath is solid, you should be able to enjoy it almost indefinitely.
When choosing a composite decking solution, you want to take a look at the entire lineup to see if the company has the style and colors you want as well as the accompanying accessories you require. Deckorators has several series of decking solutions, including the Classic, Vista, and Heritage series. Each series has multiple color options (see below). Deckorators also has railing solutions in multiple styles, colors, and sizes, including various post styles and a whole host of post cap options. There are even lighted and solar powered options.
Deckorators Classic
- Colors: Walnut, Gray, Cedar, Redwood
- Profiles: Slotted and solid edge
- Size: 7/8″ x 5-1/2″
- Surface: Vertical, embossed wood grain pattern
Deckorators Vista
- Colors: Ashwood, Sandalwood, Rosewood, Kingwood
- Profiles: Slotted and solid edge
- Size: 7/8″ x 5-1/2″
- Surface: Vertical, embossed wood grain pattern
Deckorators Heritage
- Colors: Milled Maple, Barrel-aged Oak
- Profiles: Slotted and solid edge
- Size: 7/8″ x 5-1/2″
- Surface: Vertical, embossed wood grain pattern
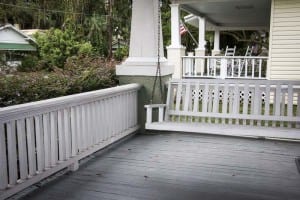
We opted for the Vista Series in Ashwood (the previous boards were painted a light gray). To complete the deck, we also selected the Contemporary Pro railing with CXT Pro balusters and Contemporary rail and Stylepoint Paramount posts and caps.
Deckorators Vista Composite Decking Features
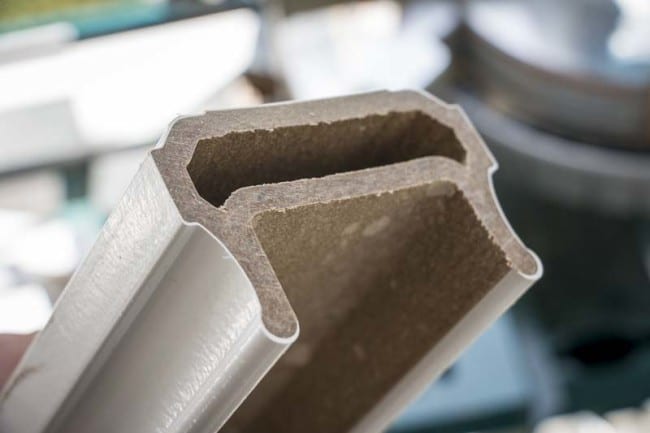
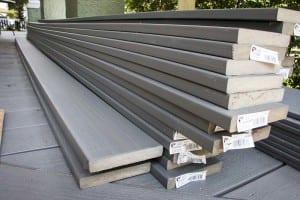 While there are a lot of composite decking solutions on the market, there are some differentiating factors between brands. For example, Deckorators offers multiple types of products, from the Classic series to the variegated Heritage—which has beautiful striations that more closely mimic the look of exotic hardwood. The Vista series is an almost perfect “middle ground”. It has a very realistic wood grain texture which delivers the looks and feel of a painted wood deck at a price point that’s affordable. Each of the Deckorator Vista series boards (as well as their CXT railing products) are composed of wood and plastic, and the boards are co-extruded with a durable polyethylene top layer for ultralow-maintenance. Because of this, it’s perfect for either surface screwing or using their recommended Stowaway™ hidden fastener which eliminates pre-drilling and automatically spaces the deck boards with the proper gap. If solid decking is preferred, you can even employ a biscuit joiner to create the slots required for the Stowaway fastener to fit into…but that’s a lot of work. There are several other brands of hidden fastener systems available that work well with Deckorators, but you want to make sure it’s compatible first. (As an example, the ones that drive screws in from the top corners may delaminate the decking, so Deckorators recommends sticking with slot-based fasteners that hold the boards directly against the framing.)
Prepping the Structure
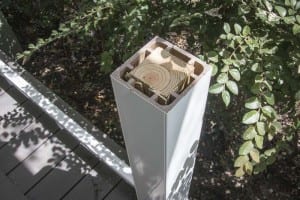
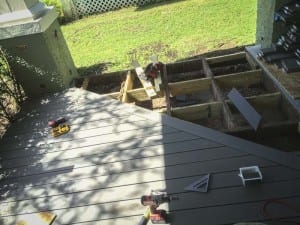 As anyone familiar with old homes can attest, the structure below the front porch on a 1920’s home is going to need some repair. Such was the case with this home, and we quickly got to work ensuring that we’d have a stable and secure surface for our decking and fasteners. We were also able to take this time to perform a slight modification to the design of the deck. Originally, the front porch on this bungalow utilized a 90 degree change in direction for the boards where the front porch connects to the side portion. It worked, but it didn’t win any awards on aesthetics. This time around, we added additional bracing and nailing points so that we could run a nice 45 degree diagonal board to bisect the front and side wraparound porch perfectly—and with a much more elegant solution.
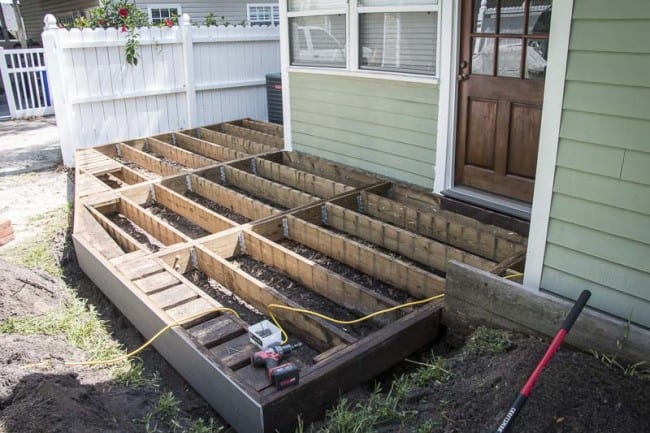
The prep work done, we moved onward with the decking, beginning with the front porch. If you’re doing this yourself, you may—like I did—find yourself with a lot of decking that needs to be stored close to where you’re actually doing the work. Because of space constraints, I had to store the Deckorators composite decking and railing on the side porch. This allowed me to work on the front porch immediately, followed by our rear deck. Finally, I would move the remaining boards (a much smaller amount) so that I could complete the side, or wraparound, portion of the front porch.
Installing the Decking with Deck-Fast Cap-Tor xd Screws
Having already experienced a hidden fastener system, I wanted to go with a simple top fastener process on this deck. It’s still a beautiful look, and the installation is rather straightforward. As I was enlisting the help of some fellow reviewers to get their take on the materials and the process, I opted for this more traditional installation method.
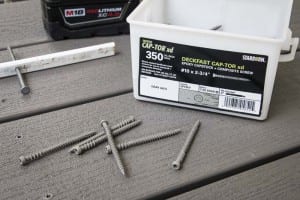 That being decided, we wanted to use fasteners that would install flush to the surface of the Deckorators Vista boards. Starborn Industries had the perfect solution, and Deckorators even recommended them. Their Cap-Tor® xd screws in Gray #37 were a perfect match to the color of our Vista Ashwood decking. In addition to being the right color, this carbon steel fastener has a Type 17 Auger Tip to drill through the composite decking quickly. It also has a reverse coarse thread portion a the top of the screw that pulls the deck fast against the joist—ensuring you don’t lose adhesion over time. In terms of durability, the Cap-Tor xd deck screws use an epoxy-based polymer resin coating to keep it from oxidizing over time. We also found that that these screws caused only minimal and occasional mushrooming, so pre-drilling wasn’t required for general fastening.
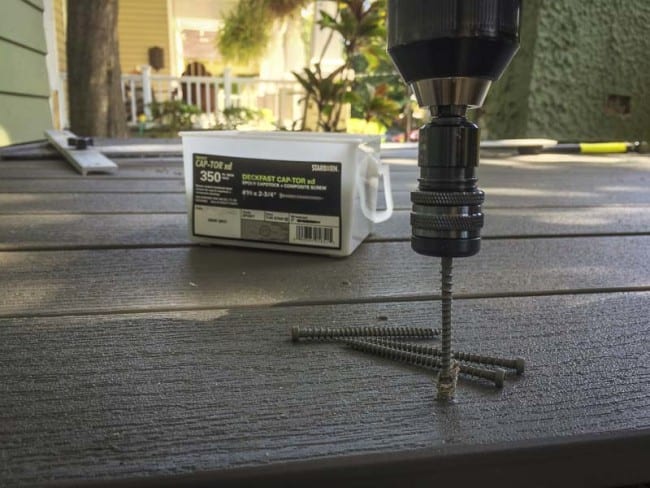
 Since Deckorators recommends a 1/4-inch gap between boards for draining and expansion, we drilled a hole in a couple of carpenters pencils and inserted a galvanized nail. Then, we could simple drop in the pencil (without it falling through) and get our perfect spacing every time. It’s a neat trick, and perfect for composite decking installation (pressure treated lumber shrinks, and so we typically install that with very little gapping down here in Florida). With a helper, and our Starborn Smart-Bit Deck Screw Depth Setter bits loaded into a Milwaukee M18 FUEL 1/2-inch drill and a Milwaukee M12 FUEL drill, we were off to the races installing the decking. Deckorators recommends pre-drilling anywhere you need to drive a fastener less than an inch from the end of any board, so we had an 18V cordless impact driver handy, loaded with a 3/32-inch bit. We’d then flip it out for a star drive bit, allowing us to drive in the Deckfast screws at a slight angle while still leaving the screw flush to the deck surface. We only used it for those particular scenarios, as an impact driver isn’t recommended for the Starborn Smart-Bit Depth Setter. Plus, it’s super easy to overdrive a deck fastener and more or less ruin your board.
Deckorators included 1/2-inch thick 11-1/4″ wide trim boards to dress out the exposed ends of the boards, and we further designed it so that a ripped horizontal board would be laid across the entire front of the decking, ensuring that there was no exposed laminate edges to be caught or snagged by anyone happening to climb up onto the deck from the front or sides. It also had the added benefit of giving us a very nice finished look.
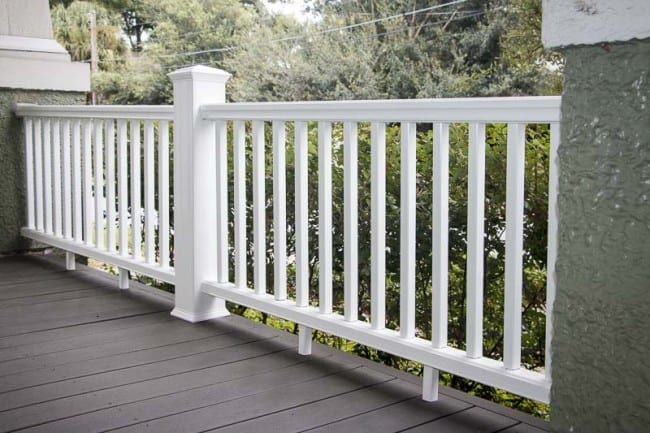
Installing the Deckorators CXT Pro Railing
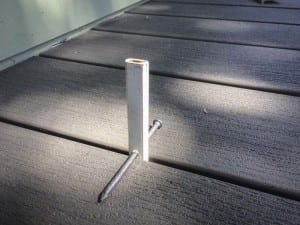
Our original bungalow style railings were very wide, so the new Deckorators CXT Pro Contemporary railing would be a slight change in style—but similar enough in look to work really well for our needs. In addition, our original railing spanned 10 feet or more or space—something not allowed under current building codes. During our prep phase we added supported 4×4 posts for midpoints for our retailing, giving us the ability to use the available lengths provided by Deckorators and solve our support issues at the same time.
The CXT Pro Railing comes in kits that include an easy-to-install railing with a CXT Pro Contemporary rail that slides right on top. A 5-1/2 inch Paramount post sleeve slips over the 4×4 posts, giving you a much nicer and more classic-looking post for the railing. We also went with a traditional-looking Stylepoint Paramount post cap.
 The first thing we did when installing the railings was install and shim the Paramount posts. This gave us our measurements to cut and install the top and bottom railings. We built up out of the original stucco which held the old railing in place (historic houses, what can we say), and fastened the new railing straight into the brick pillars using large Tapcons (being careful to drill into actual brick and not the old mortar). After this, it was simple matter of measuring, placing, fastening, and repeating the process for each section. You begin with the lower inner post, measuring carefully and using the included stainless brackets to hold it in place against the Paramount post and (in our case at least) the stucco-covered brick pillar. You then measure the width for the top rail, attach the balusters to the inner top rail, position everything in place, and add the finished Contemporary top rail.
 We opted to do an entire section of railing to get the hang of things, and then went to town on the remaining bottom rails—creating a sort of assembly line for all of our work. This allowed us to do a lot of repetitive tasks and gain some efficiency (I had a good friend over to help during this phase, and it made all the difference). While it took us longer to get everything together than it would likely take an installer experienced in using the Deckorators system, I have to say that everything was very straightforward and simple. About the only complication for us was our custom railing height—which lost us a bit of time as we were unable to use the supplied templates and stock balusters. In an ideal world, you’d screw together the balusters into the inner railings for the top and bottom pieces and assemble the entire structure one section at a time—it’s a fantastically quick system for new construction.
Conclusion
The Deckorators Vista Composite Decking is a great product that’s already won its share of compliments from friends and neighbors. It has a great look; is durable; installs easily; and comes in a variety of styles, colors, and sizes. The before and after of the front and back porches is nothing short of astonishing. If you’re upgrading a deck, going with a composite decking system is a no-brainer. Going with a composite system that has an ample choice of styles and which also provides a simple installation method is another thing you want to be sure to consider as well. There’s more to it than just picking a board and choosing your fastener—Deckorators composite decking and railing seems to really provide a great blend of everything that makes these renovation projects successful.

We really liked working with this brand, and Pros and homeowners alike will really appreciate the ease of installation—possibly more than the breadth of options in their product catalogue. Not everyone has the same tastes, and having a manufacturer who can provide products in contemporary, classic, Baroque, or craftsman styles is nothing short of admirable.
