
The new Pro Tool Reviews workshop and storage facility is handier than your favorite pocket knife. The problem is that—like all construction projects—it’s gone up in stages. Because of this, we’ve used it for weeks on end with temporary power. How? By using a long (really-long) 10-gauge extension cord wired to a quad—and then on to other extension cords. Considering we review professional power tools on a daily basis, it was a top priority to get that permanent service wired up and operational. In this interim period we felt a lot like that great paint and body man you know who performs six-figure restorations on the rarest of cars, yet drives a ’76 Nova still in primer. It was time to run steel building electrical conduit and finish the job.
Enough was enough, so we reached out for the first piece of scrap cardboard we could find and started scratching out a diagram for the new electrical layout. After a couple hours, we had it down to a science, so we thought. Little did we know that by the end of the project we’d be on our 15th revision of said layout.
Planning Our Steel Building Electrical Conduit Runs
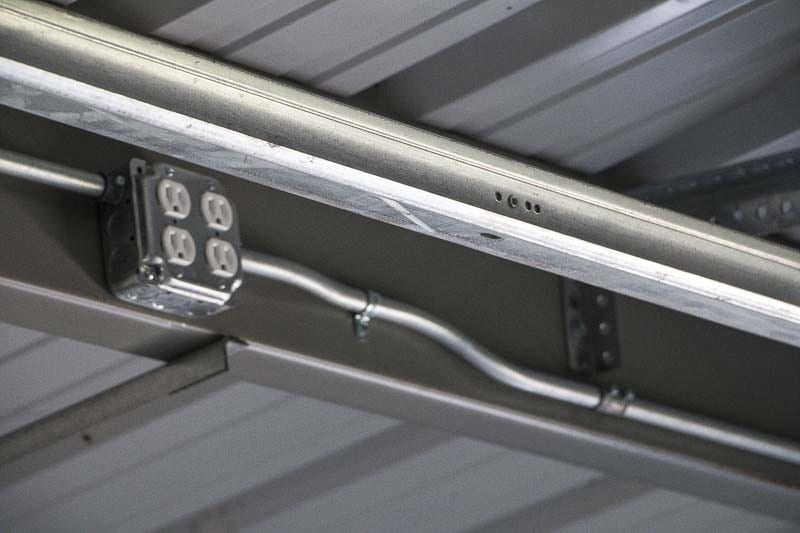
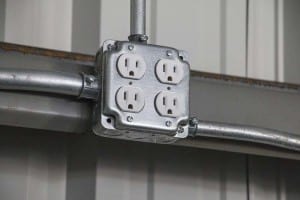
Being this was a steel building with I-beam structure, we knew we’d be running lots of conduit. We would also need to do a lot of offsets for outlet boxes and measure correct distances to start the 85 degree bends to get the correct overall length. We opted to use ¾” conduit for our main “trunk” lines down the full length of the shop. We then ran ½” conduit off the ¾”, much like a spider system. When completed, our steel building electrical conduit layout would be both efficient and flexible.
After consulting with a few professional electricians, we concluded the best wire to run was 12-AWG stranded copper THHN throughout the building for the 110v lines. The welder and other 220v stuff will come later. We also decided to run a quad anywhere there would be an outlet; it’s pennies difference, so why not have 4 outlets instead of just 2? We also separated each quad into 2 circuits. This would ensure that plugging both a grinder and a vacuum into one quad wouldn’t trip one of our 20A breakers.
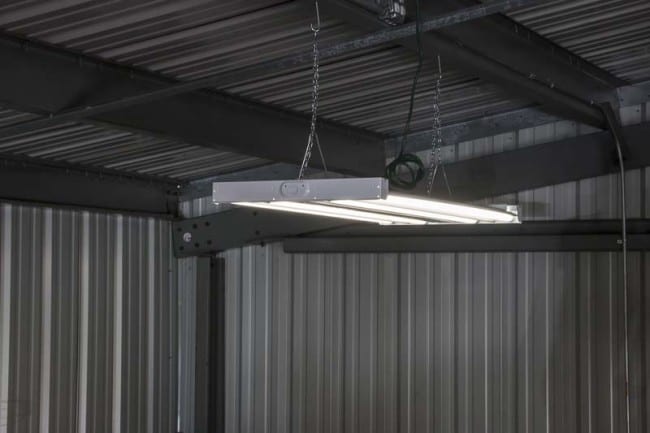
Other than outlets, the only other electric needs in the shop were the overhead bay lights and the LiftMaster Elite Series garage door openers to raise our insulated Clopay commercial shop doors. We ran one circuit for the lights, since they will eventually be LED products, and one circuit for the two LiftMaster door garage openers.
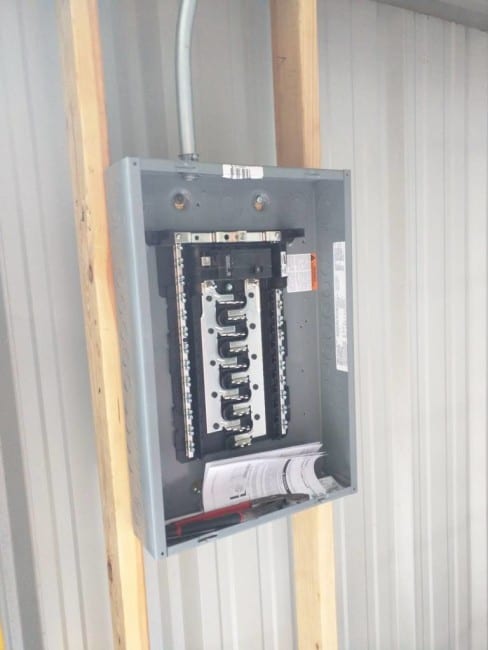
The power coming from the utility company will be running through a Square D 40-circuit 20-space 100-amp main breaker load center. This not only took care of our immediate needs for terminating the steel building electrical conduit, but also gave us plenty of expandability as we grow in the near-future.
From Computer to Shopping Cart to Truck
Step one of planning your project was popping open the laptop and filling the Lowe’s virtual shopping cart with all the required electrical goodies. After some quick searching and entering the correct quantities, the Lowe’s website made it very easy to complete the order, and our local store had it ready for pickup when we got there. Off we went with our shopping carts to load the truck and head back to the shop.
 We really did a great job at planning for this venture, with exception of one thing—I’ll get to that in a minute. Typically, we hit around the 75% mark, and need to make additional trips to the store to wrap up the project. Not this time, we nailed all of our supplies except for one thing: Wire. You really need to know how much wire you need to purchase and pull. Also, make note that you won’t likely be pulling the same amount of all wire colors. Green is ground, and you only need to run one ground throughout (if you do it right). White (neutral) can also be shared with two-pole breakers, so it goes a long way as well. Your Black (common) wire will go quickly, and if you’re running dual circuits for each quad, you’ll need some Red wire as well. In our case, even knowing this we should have purchased more Black.
The Real Work
First to determine was where exactly to put the Square D 100-Amp Main Breaker panel, then run our conduit from there. Some quick work with 2x4s, a miter saw, and some screws had us a mountable surface for the panel. Next we ran our ¾” conduit from the panel, up the end wall and followed the roof girders down the full length of the shop. This job would be near impossible without a ¾”-in EMT Conduit Bender and ½”-in EMT Conduit Bender. We used a couple of Klein benders, and they were flawless and well-built.

Each electrical box must have an offset bend in the conduit, so the conduit can be strapped within 3′ of the box. I would try to explain the details in making this offset, but the words would be too many to count, and the YouTube videos are plentiful. The best advice I can give to those starting out is just start bending and note how the marks on the bender line up with both your fulcrum point and your bend. Conduit is fairly cheap, and you’ll learn from your mistakes. Of course, you could hire a professional and marvel at the speed and fluidity as they mold the conduit with a master’s hand.
 Once the conduit and electrical boxes are in place, then it’s time to chase the many wires inside the conduit. There are several choices on how to stuff your conduit with your choice of copper: push, pull, suck, or blow. I was amazed at how easy the stranded copper could be pushed through the conduit, especially in larger bundles. A fish tape can be used to pull the wire as needed and will also give you more ability to ‘man-handle’ the wires where they need to go. Using compressed air, a ‘parachute’ and a string, you can blow string through the conduit, then use the string for pulling wire. Finally, the method we used most, involves taking nylon pull string, tying on a ‘parachute’ made from a piece of plastic bag, and then use your favorite dust extractor or vacuum to suck the string to your desired location. You then pull the wire(s) with the string through the conduit.
Securing Stranded Wiring
Once you pull all wires to their respective locations you can begin terminating them at the outlets and switches. Using stranded copper wire has a different feel when wiring up an outlet or switch. Typically, with solid copper, you can strip the wire, make your hook/bend, then secure the wire by tightening the screw. With stranded wire, if you follow the same procedure, you get a few or more loose strands of copper that won’t be properly secured by the screw. Knowing some tips and tricks of the trade will aid in your stranded-copper wiring efforts.

When stripping the insulation from the stranded wire, don’t fully remove the insulation. Pull the insulation to expose about an inch of copper, but leave the insulation on the wire. Now grab the insulation that’s still hanging on the end of the wire and twist the stranded wire in the opposite direction of it’s current state; when looking at the end of the wire, twist the wire counter-clockwise. Wrap the wire clockwise around the screw terminal and tighten screw securely. You can now trim the wire and insulation with your favorite wire-cutters, side-cutters, or dikes. This will give you a secure, neat and tidy connection at each terminal.
The conduit itself can be used as ground, but we went ahead and ran a ground wire that was terminated at each box and outlet. Even if the conduit separates over time at one of the many junctions, our ground still offers protection through the 12-AWG THHN stranded copper. The other end of the ground wire terminates at the 100 Amp panel, and then finally at the two 8-foot copper rods driven into the ground, outside the shop.
Testing the Steel Building Electrical Conduit Runs
After completing all the outlets and switches, it was time to test our circuits. Without power running through the panel, we tested each circuit to ground, using a standard voltmeter. Once we confirmed all circuits were worthy of current, we turned on the main 100 Amp circuit, then began turning on one breaker at a time. Voila, our shop now had power and lights. After having dealt with temp power for so many weeks, it was really nice to walk in an flip a switch to turn on the light. It was even better when we could just walk over to any of the 48 outlets in the shop and plug in a tool and/or charger of our choice.
To sum it all up, this is really a job for the professional electrician, but since we have many great electricians in earshot of a phone, we tackled this one on our own. All the tools, products, and supplies we used can be found at your local Lowe’s store. So if your shed needs lights, or you’re sick of your carport not having any/many outdoor outlets, check with your local building/permitting codes, load up your cart on the Lowe’s App or website, and keep safety first.
